Capture One Initial Reaction
My first impression of Capture One 11 Pro for Sony is based on about a month’s usage and a lot of time watching YouTube tutorials.
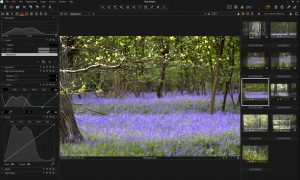
First off, Capture One is a “big boy’s tool”, and at first glance appears much more complex than Lightroom Classic CC let alone the simplified and web-friendly Lightroom CC. It clearly has tethered operation for studio shooting right at its core and is designed to meet the needs of the professional fashion and beauty photographers who will buy the 100 megapixel Phase One cameras.
Big wins for me so far are:
- It allows me to shoot tethered with my Sony A99ii (Lightroom only supports Nikon & Canon). In fact Phase One (maker of Capture One) seems to have a generally more healthy relationship with Sony than Adobe does, which rather pleasantly results in a much lower price point for Sony users
- It doesn’t crash my current ageing laptop with anything like the regularity that Lightroom Classic CC does
- It is impressively quick and doesn’t seem the least bit fazed by the A99ii’s 85MB RAW files, which are small by comparison with the files produced by the Phaase One medium format camera the software was built for.
Coming from a background of using Adobe products on a daily basis, Capture One seems to have more in common with Photoshop than it does Lightroom, in particular the use of layers and output in TIFF format.
My current hero, Ted Forbes speaks highly of Capture One vs Lightroom. which alone means it is worth a look, in my opinion.
If you have any comments on this post, please post them below.
To see more posts on other photographic topics, or to follow my learning progress, please like or follow me on the social media channel of your choice to the right
Initial Attraction of Capture One
It is generally thought that Lightroom Classic CC provides good tethered shooting support for Canon and Nikon cameras, but others, such as Sony, are poorly supported. This is a huge disappointment as I generally love Lightroom Classic CC.
Talking to exhibitors at the Photography Show at the NEC, on 18th March 2018, also convinced me that Phase One have a closer relationship with Sony than Adobe do.
Although it’s free to take a look at Capture One Pro, the free version doesn’t support tethering. So, money spent.
Intended Workflow – Tethered Sony A99ii
From my initial assessment:
- Lightroom Classic CC does a good job of file management and has stable export and links to the social media platforms I use: Facebook, Flickr and Instagram.
- Photoshop is unsurpassed with regard to detailed manipulation
- Scope for Capture One is: tethered capture, RAW conversion, colour adjustment and initial editing.
My goal is to utilise the best of all systems in an integrated workflow. See below.
Comparison with Lightroom Classic CC
Capture
Capture One has two modes of operation:
- Catalogue – which rivals and replaces Lightroom’s catalouging features
- “Session” – which is for a single session and one suspect was designed for use in conjunction with Lightroom.
Since I intend to continue to use Lightroom for cataloguing my images, I have the system set up at the moment as a “Temp” session. I work on images here, and then Export to Lightroom Classic CC.
In this mode, regardless of whether shooting tethered or importing from a memory card, images are imported into a session sub-folder called Capture. Other sub-folders automatically created are: “Selects”, “Output” and “Trash” for the use implied by their names.
Import from a Memory Card
Capture One and Lightroom are remarkably similar in how they work in this respect, both are equally competent and the differences are not worth dwelling upon.
Tethered Shooting

Main purpose of the purchase. Frankly, even for supported cameras, tethered capture in Lightroom Classic CC feels like an add-on, accessible through the File menu. Whereas it’s right at the heart of Capture One, and the primary way of getting images into the system.
After resolving the problem with my cable through a £35 purchase from TetherTools, the system worked perfectly, first time. I do not have a huge amount of experience using this as yet. However, basic operation and camera control seems completely intuitive. Raw files are immediately placed in the Capture folder, just as they would be had you Imported them from a memory card.
The LiveView option selectable from the Window menu is a pop-out window that can be placed on a second screen. I thought this was quite cool initially but an to be convinced how useful it is in the long term. It does have the tendency to slow the system down (as it would).
There are lots of useful features whereby one can make adjustments to one image and have them apply to all subsequently shot images.
Culling and Keywording
In both systems it is equally easy to scroll through a number of images, comparing and marking up with start numbers or colours as one goes. Slight advantage to Lightroom Classic CC with its in built support for dual screen operation, which I currently enjoy.
Big difference: Capture One Pro 11 is much faster at building previews. This makes Capture One more relaxing to use as significantly less time is spent waiting for previews to be build (yes, I already use the “prebuild 1:1 previews on import” setting in Lightroom and it’s still slow).
Capture One doesn’t seem to have the equivalent of the “x” or “p”, to mark for deletion or pick, which I currently use as part of My Workflow. However, my workflow could and will be improved.
Both systems have comparable Keywording and search facilities.
Focus Tool
Capture One’s focus tool shows which areas of an image are in sharp focus. [View menu: “Show/ Hide Focus Tool], adjustments made in Edit – Preferences – Focus. Apparently, this is designed to help you quickly scan through a large number of similar images doing an efficient “first cull.”
Jury’s out as to just how useful this is as it can’t be 100% accurate, e.g., how can it tell if the whole of a block of colour is in focus. Plus, I think Adobe’s AI tools implemented in Lightroom CC may have the edge here – at least in theory.
Global Adjustments
Exposure and Toning
Capture One has all the same basic sliders as Lightroom Classic CC, i.e., Exposure, Contrast, Highlights Shadows and Whites (which it calls Brightness) but interestingly not Blacks. The Blacks are dealt with via a Levels controller which is very much like Levels in Photoshop.
What I like about Capture One is that all the controls (sliders, levels & curves) feel connected; you change one and the others move as well..
Colour Toning
This is much more sophisticated in Capture One, and I suspect will take some getting used to. For example, one can adjust the white balance separately for highlights, mid-range and shadows in a way that offers more control than Lightroom’s Split-toning tool. Or one can simply adjust the overall temperature and tint, just as one would in Lightroom either using sliders or the eyedropper tool.
For creative colour adjustment, I created a number of presets in Lightroom that implement colour themes discussed in my “Colour Theory – First Learnings” post. Along with the standard preset provided with Lightroom or others provided by third parties such as NIK or ON1, these work fabulously well and enable me to quickly try alternative colour themes as a starting point and then fine tune afterwards, if necessary.
Capture One Pro has a similar facility called Styles which looks fairly extensive out of the box and I haven’t looked into implementing my colour themes as yet, and I would be amazed if this were not possible.
Light win to Lightroom here due to the volume of third party presets.
Sharpening/ Noise Reduction
Sharpening is slightly more sophisticated in Capture One, with a “Halo Suppression” function, sounds like a good idea, but yet to try in practice.
Local Adjustments
Spot Removal
Capture One differentiates between “Spots” and “Dust” which in theory gives it a bit of an edge; but in practice, both systems are adequate.
Layers
One of the fundamental differences in the way Capture One works vs Lightroom is the use of upto 16 adjustments layers which, just like the layers in Photoshop, can have a mask. There are a number of tools for creating and editing masks – broadly similar to those available in Photoshop.

Integration with Photoshop (and Lightroom)
From my experience thus far, both systems seem equally adept at editing an image in Photoshop and re-importing the edited image.
As far as I know, you cannot start by importing an image into Lightroom, and use Capture One for RAW processing and editing. So one starts by importing images into Capture One where the RAW processing takes place, along with
Batch processing
The ability to copy and paste adjustments between images, seems broadly similar between the two systems. Although this is one area where I find Capture One slightly more intuitive that Lightroom where I am forever tying myself in knots with the Sync function.
In addition, Capture One allows for individual adjustment layers to be copied and applied to multiple images. Although useful in theory I have not found myself needing this as yet.
Comparison Summary
Lightroom, in all of its variations, delivers a lot of value early in the learning curve – it’s intuitive and makes simple tasks easy to achieve. This is less the case for Capture One. I consider myself a reasonably experienced user of Lightroom and Photoshop, and I found the interface initially quite intimidating. However, once one gets past the initial familiarity challenges, Capture One is certainly the more flexible and powerful system.
Going Forward
Change is hard. I have invested a lot of time in learning Lightroom Classic CC and when it works, I like it. However, I am growing to love Capture One. I have linked the two systems so that I can:
- RAW processing, image selection and initially editing using Capture One (tethered or not)
- Further editing in Photoshop
- when happy, Export, which places TIFF files in a folder which is being watched by Lightroom Classic CC and will be Auto-Imported
- Lightroom Classic CC maintains my image archive and manages output to social media channels and JPEGs for inclusion in this website, distribution or any other purpose. Archiving, watermarking, file export, etc. are all thing that Lightroom Classic CC is very good at.
The only major drawback, that I am as yet to resolve with this workflow is the fact that the original RAW files are not kept with the finished images. So going back, if a complete re-work is required, is a major pain. Hmmm …
If you have any comments or questions about this post, please comment below. Or alternatively, connect with me through the social media channel of your choice right. In fact, please do that in any case!