First Commercial Assignment – Learning Architectural Photography
Arguably the best way of learning architectural photography, is to actually do it. The scariest way of learning architectural photography is to get paid for a real assignment. I achieved the later through a friend who runs a building company specialising in high-end residential property. Some commercial properties, but mainly multi-mi££ion “Grand Designs” style contemporary new-build or conversions.
Back in January when I was “shooting the shoot” for the Larsen Syndicate, one of the guns explained that he wasn’t particularly happy with the photographers he had used in the past, and we discussed the possibility of me doing some work for him. He insisted that he would pay me; a good idea all round, but nothing happened for 7 months. Then I received a phone call asking if I might like to photograph a house they had worked on. This turned into two houses, and the promise of other work including more properties, a company shoot and a time lapse of a major project. All before I had actually done anything.
Having never shot houses before, I had to learn fast. I purchased an FStoppers on-line course from Mike Kelley and set about practising on my own home, as above.
If you have any comments on this post, please post them below.
To see more posts on other photographic topics, or to follow my learning progress, please like or follow me on the social media channel of your choice to the right. Thank you.
On-line Course “Where Art meets Architecture”
I parted with nearly $300 largely because the title of the course is very much in line with my objective of learning the art of photography; the good reviews helped seal the deal, but emotionally I was sold on the title.
Mike’s basic principles are as follows and rely heavily on post-shoot manipulation:
- ensure that edges of the property that should be vertical look vertical. Wide-angle lenses make these lean in or out if the lens is tipped down or up. In addition to which there is barrel distortion which should be corrected on input. Accurate horizontals and verticals give the impression of solidity, which is obviously important for architecture.
- make the subject stand out from the background – if shooting a person, this is easily done with a single on/off-camera flash; working with a building, achieving the same effect, usually has to be done in stages to ensure that there are no dark areas
- emphasise the details – use lighting to draw the viewer’s eye to key features of room or building. Area of maximum contrast.
Essentially the above means, for both interior and external shots, make a number of exposures and combine in Photoshop.
Dry-run on My Own House
Internal Images
Selection of the optimal shoot angle and camera set-up
Unlike Street Photography, Portraiture, or just about any other form of photography where changing perspective is part of the creative processes, architectural photography requires selecting a view point and making a number of exposure from a single camera angle. Big decision – get it right.
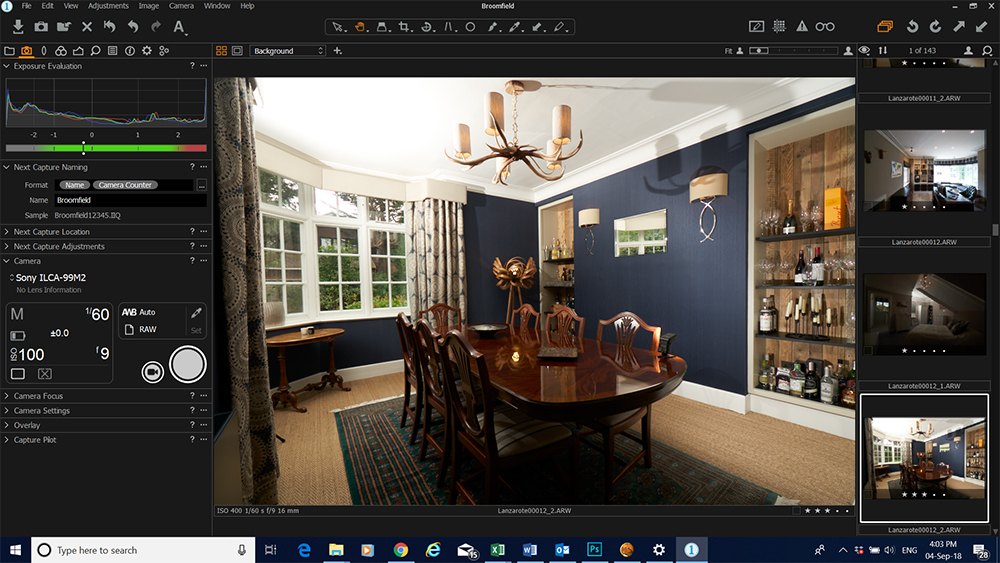
Shooting the dining room in the image below, the most impressive elements of the room are the recessed drinks cabinets. This implies a shot from one of the corners, using a wide angle lens, in my case the 16mm end of my 16-35mm zoom. Diagonal shots with a wide angle lens can introduce uncomfortable distortions where the floor or ceiling appears to slope, unevenly and in a manner that can be difficult to correct in post processing. Shooting at 45 degrees into the room, minimizes the impact of this distortion by at least making it symmetrical. The image below was not quite shot at 45 degrees and, looking at it now, I notice that the floor is not quite even!
[Tip: wherever possible, when using a wide angle lens, shoot directly down the middle of the room.]
Shooting tethered to my laptop running Capture One Pro, configured to compensate for barrel distortion on input.
Collecting exposures
Firstly, get some purely ambient shots heavily bracketed +/- stops either way. These are an insurance policy to reveal detail in areas that may prove problematic when we are producing the composite image.
Secondly, add artificial lighting to balance against the external light from the windows, and as far as possible create even lighting across the scene. In the above image the garden is an important part of the scene, without being overpowering. The goal here is to create a base layer that can be added to in Photoshop.
[Camera on tripod, I use myGodox X1T(S) flash trigger and the Pluto remote camera trigger. This means, I can take shots whilst holding a Speedlite. Main illumination inside is usually provided by a Godox TT560 speedlite on a stand with a shoot-through umbrella; my little TT350s is used to light highlights. See “My Kit” for details.]
Thirdly, take additional exposures that can add detail to specific areas in the image, e.g., to lighten dark areas of the room or highlight points of emphasis. The screenshot above shows the right most drinks cabinet being boosted by the speedlite on the table.
If used alone, the exposure in the screenshot above would be a case of “spot the errors”, including:
- Tripod leg at bottom of curtains
- Speedlite on the table lighting the drinks cabinet
- Not all verticals are vertical, in particular windows leaning left
- Big shadows on the ceiling.
However, none of this matters at the individual exposures will be combined and corrected in the next stage.
Process and merge exposures in Photoshop to achieve the final image
Basic RAW processing only in Capture One Pro, adjusting only white balance to achieve consistency between images (even this step is only necessary as a consequence of my always using Auto White balance in-camera).
Then:
- select the exposures I think I will need for the final image, erring on the side of more rather than less
- create 16 bit TIFF files
- save to an external disk
- transfer to my desktop computer
- import into Lightroom Classic CC.
Within Lightroom select the exposures likely to be required for a particular image and “Edit as Layers in Photoshop”.

Photoshop – seven step blending process:
- make sure the exposures are perfectly aligned (some tiny movement may have occurred even with the camera on a tripod); select all layers and <Edit><Auto Align Layers>
- rearrange layers so the best overall exposure is the base layer (at the bottom of the stack) and the only one visible for the time being
- wherever this base layer needs improvement
- find a layer where this aspect of the image is improved
- selectively blend this in using a combination of masking, and usually the “lighten” blend mode.
- Repeat this step as necessary
- when absolutely sure the previous step has been carried out to the fullest extent. <ctrl><shift><alt>E to stamp a new layer and clone as necessary
- add guidelines positioned near critical verticals. Then adjust the verticals in the image by <Edit><Transform><Skew> and pulling out the corners until the required verticals are vertical (sounds complicated, but is in fact remarkably easy)
- Add a Levels layer and adjust to ensure that the entire tonal range is covered
- Add a Curves layer to add contrast as necessary (Sean Tucker tip: add 3 adjustment points representing shadows, mid-tones and highlights; adjust the shadows, then highlights, then the mid-tones to smooth things out.)
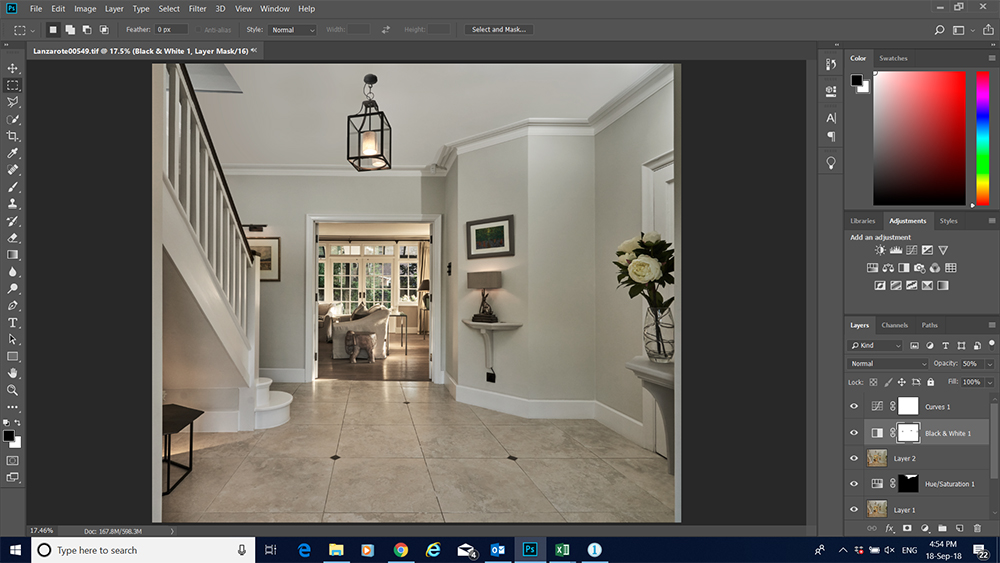
Another example below, which has been 50% converted to black and white to add a high contrast contemporary feel.
External Images
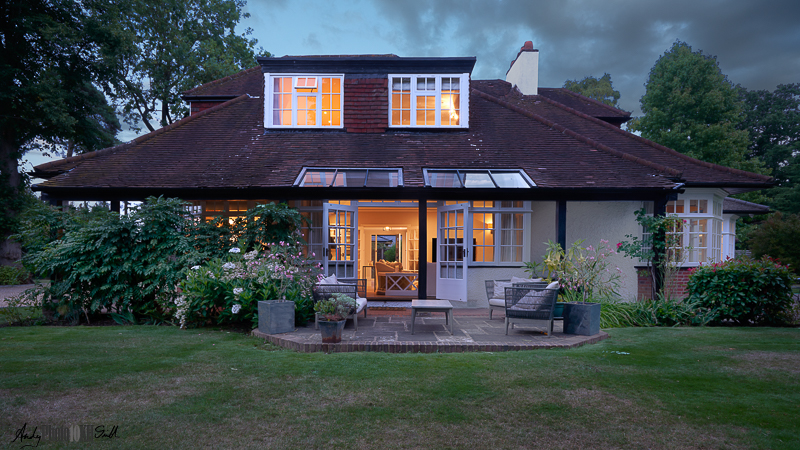
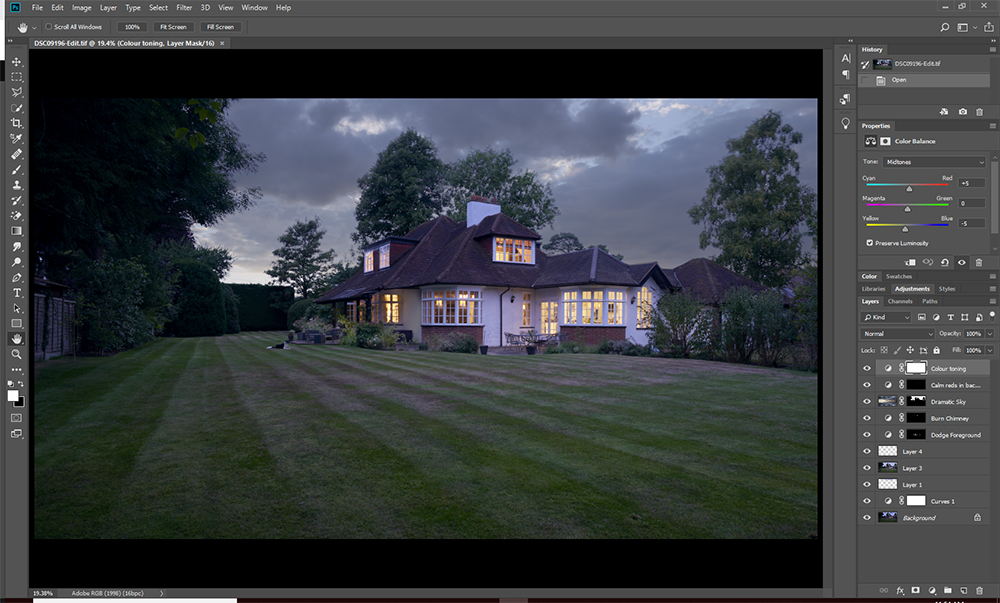
Houses look most welcoming, and therefore attractive in the blue hour just after sunset. Matching the warm glow from windows with external lighting requires similar composite techniques as are used for the internal images. The screenshot below shows how the upstairs windows have been selected using a mask on a Colour Balance adjustment layer, and adjusted so that they are less red.
Selection of camera angle
The issues of using a wide-angle lens for external shots are the same as for internal images:
Shoot absolutely horizontally to avoid unnaturally converging or, worse, diverging verticals. Ensure that the camera is aiming at a point on the building at the same height as the middle of the lens on the tripod – in most cases one can approximately measure the height of lens against your body and then see the corresponding height on the building (assumes level ground between camera and building).
Collecting exposures
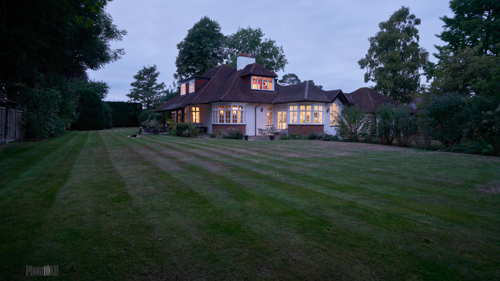
Make sure all the lights are on in the house so that the building looks occupied, welcoming and alive.
The first task is to create a base-layer, this is an optimally exposed shot in ambient light. Then take some bracketed exposures, at least: one stop over, two stops over, one stop under and two stops under. Achieve this by changing the shutter speed, i.e., keep the aperture and ISO constant. ISO should be at the lowest native setting for all these shots; ISO 100 is the lowest native setting on the Sony a99ii.
Then take further exposures lighting the building, particularly shadows and points of emphasis using an external flash. This makes the building stand out from the background, but at the expense of the light from inside.
Blending exposures in Photoshop
The process of combining exposures for external images is broadly the same as that for internal images, but with the additional complication of the sky
Changing the Sky
I will probably do a separate post on the nuances of this. Three points for now:
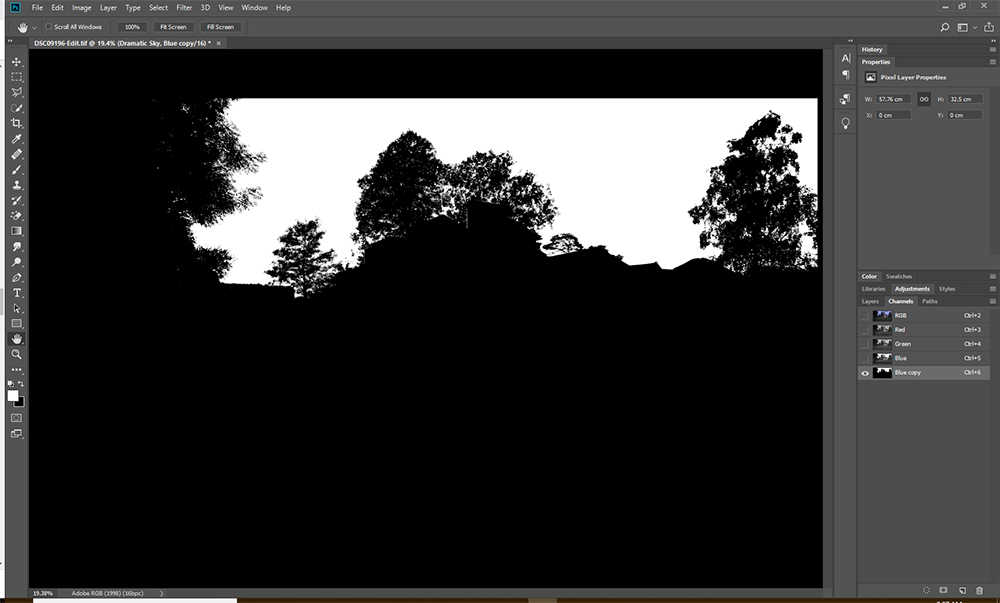
Firstly, selection of the shy in the original image:
- Go to the Channels panel in Photoshop and copy the Blue Channel
- Adjust the levels in this layer to increase the amount of absolute black to cover all (vast majority of) the non sky area
- Edit to black any remaining bright non sky areas, e.g., windows, doors, white paintwork, etc.
- From the Selection menu choose “Load Selection” to create a mask for the new sky to be added below.
Secondly, choosing a suitable replacement sky. I am gradually building a bank of skys from different times of year that have the following characteristics:
- 50% cloud, 50% blue sky for maximum impact
- horizon half way up the image to exactly match the horizon level on a architectural photo using a wide angle lens to avoids converging or diverging verticals
- metering mode: “highlight priority” to capture maximum detail in the clouds
- versions at both 16mm & 35mm pointing towards the West, North, East & South.
See: example set shot on 25th September 2018.
Thirdly, when masking in the new sky, brush in a bit of reflection on the windows and a very light amount on the
Practical Issues on the Day
The brief was to create some images that the company can use on their website.
I had asked for 2 hours at each property and, email correspondence suggested, this had been agreed with the property owners. However, the property owners, and the company director who accompanied me, are busy people and I felt pressured to get the job done in less time.
External shots were taken in the middle of the day with a dull grey overcast sky. However, these were changed to create more pleasing images using the techniques discussed above.
Lessons from Delivering the Images
- Delivering a set of images: must look consistent. My first attempt looked like a collection of photos all taken by different photographers – very bad
- Deliver images in their best possible form, i.e., with the skys already altered. Do not leave this to the imagination of the client, or ask for direction on this point.
- Images should be shot to a standard aspect ratio. Although the brief was to create image for the website where aspect ratio is less important, the client then wanted to print many of them for display in their boardroom, where a consistent aspect ratio is important
- Spend more time with the client explaining how I work and opportunities for shots prior to going to location.
Next Steps
I’m hoping to become the company’s default photographer so that I can practice absolutely top-end work on their top-end properties.
At the time of posting this I have:
- Shot two high-end houses they have worked on
- Shot some images at Worcester College
- Initial investigation into an 18 month time lapse project
- Taken images for a corporate shoot involving c. 60 staff and 30 company vehicles.