
This post is an update to the “Setting Up the Sony a1” post published on 12th August 2023, builds on the experience of using the camera on an almost daily basis since that time, and was prompted by the issues I experienced during an intensive 10 day safari in Botswana and potential improvements in camera customisation summarised on the 7th May 2025
Much of this post remains largely the same as in the predecesor post, particularly relating to memory functions 1 & 2 (Portraiture and Action), and most of the button customisations. However, memory function 3 which was previously reserved for Landscape or Creative has been changed to Wildlife
Overall Approach: Objective & Structure
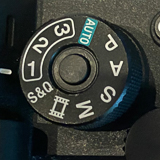
The starting point for using the a1 for anything other than studio work is the 3 memory functions. Memory mode 1 for portraiture, 2 for action and 3 for wildlife. This means I can quickly set up the camera to suit the environment I’m in and swiftly adapt to opportunities that might occur. For example if I’m shooting landscapes using manual mode and suddenly encounter a street portraiture opportunity, I set the a1 to memory mode 1 and know that this will do a passably good job straight away, allowing me to concentrate all my effort on conversation with my potential subject and make refining adjustments if/ when necessary later
Structure of this post:
- Memory Settings (Shooting)
- Portrait
- Action
- Wildlife
- Button Customisation During Shooting
- Button Customisation During Review
- Menu Favourites
- Fn Button Customisation
Memory Settings (Shooting)
This section looks at the 3 shooting scenarios that I may want to adapt to quickly, or temporarily. For example, if I’m out shooting landscapes with camera on a tripod, manual settings, etc., and suddenly see an opportunity with a horse coming towards me, I want to switch to “Action Mode” (memory setting 2), shoot the horse, then pick up where I left off with my landscape work. This is what the memory settings allow me to do
1. Portrait
Scenario: suddenly see someone interesting in the street as a potential portrait subject. I need to devote my attention to developing a rapport with them without pausing for adjustment or even thinking about camera settings
Starting settings:
- f/4.0 to provide an appropriately shallow depth of focus but enough to ensure that all of someone’s face is in focus from tip of nose to front of ears in a head and shoulders shot. This is also close to the sweetspot for both my f/2.8 70-200mm GM II and f/1.4 35mm prime. Note: both my 70-200mm GM II and f/1.4 35mm lens have an aperture setting on the lens which will override what is set in the camera, unless this is set to auto.
- “A” mode for aperture priority, so the shutter speed is set automatically
- Auto ISO, the camera will keep this to ISO 100 or 200 unless the shutter speed would otherwise exceed the focal length of the lens, e.g., unless the speed would be slower than 1/50 second for a 50mm lens
- Auto white balance – most of the time it gets this right and it doesn’t matter too much if it’s inaccurate or variable as you can change this in RAW conversion without any loss of quality
- Creative Look: B&W (aids composition, as per Simon Ellingworth’s Street Photography course in Soho on the 25th of May). The RAW file, of course, will be in colour.
- SteadyShot: On – note on the 70-200mm GM II the OSS should be set to mode 1 which assumes that the subject is basically stationary and that the bulk of the movement will be as a result of camera shake
- Metering Mode: Multi
- Focus: continuous autofocus, so the if someone is moving slightly, the camera maintains focus
- Focus Area: Expand Spot Tracking
- AF Tracking Sensitivity: 3 (standard)
- Eye auto focus: on and set to “human”
- Lossless, compressed RAW, which seems to be the optimal for Sony Cameras
Mode specific button customisation:
- Holding the focus hold button on the lens: low burst mode at 5 frames/ second
2. Action
This will most often be used with the 70-200m GM II zoom for shooting sport or other moving subjects
Starting settings:
- f/2.8 – wide open – although this might be overridden by the setting on the lens (70-200mm GM II or f/1.4 35mm)
- “A” mode for aperture priority
- Auto ISO
- Auto white balance
- Creative look: normal
- SteadyShot: On – note on the 70-200mm GM II the OSS should be set to mode 3 which tracks a randomly moving subject (or mode 2 if we know we will be panning horizontally) lock tracking
- Metering Mode: Centre
- Zonal Auto focus so that the camera with look for eye and focus centre and forward within this area.
- Focus: continuous autofocus, to track moving object
- AF Tracking Sensitivity: 1 (Locked On)
- AF/MF – Priority Set in AF-S (and AF-C) = Release; to take the shot regardless of focus lock and to permit the maximum frame rate)
- Eye auto focus: on and set to “human” (C3 will toggle between: Human/ Animal/ Bird)
- Compressed RAW (to allow for the fastest shoot speed of 30 fps)
Mode specific button customisation:
- Holding the focus hold button on the lens: medium burst mode at 10 shots a second
3. Wildlife
The purpose of the new definition of the menu function is using the 400mm prime lens for wildlife photography
Starting settings:
- f/2.8 the widest option on the FE 2.8/400 GS OSS prime lens
- “A” apperture priority
- Auto ISO (minimum speed 1/1,000)
- Auto White Balance
- Creative look: normal
- Steadyshot: on
- Metering Mode: Centre
- Focus area: Tracking Spot Large; options limited to the tracked focus options excluding central spot
- Focus: continuous autofocus, to track moving object
- AF Tracking Sensitivity: 2 (almost locked on)
- AF/MF – Priority Set in AF-S (and AF-C) = AF; to only take the shot if the camera has a focus lock (does not allow for the maximum frame rate but neither does the Lossless RAW below)
- Eye autofocus: on; set to Animal; limited to Animal/ Bird
- Lossless, compressed RAW for maximum quality
Mode specific button customisation:
- Holding the focus hold button on the lens: low burst mode at 5 shots a second
- Function ring, on the 400mm G lens: only seems to do “Power Focus” whatever this is
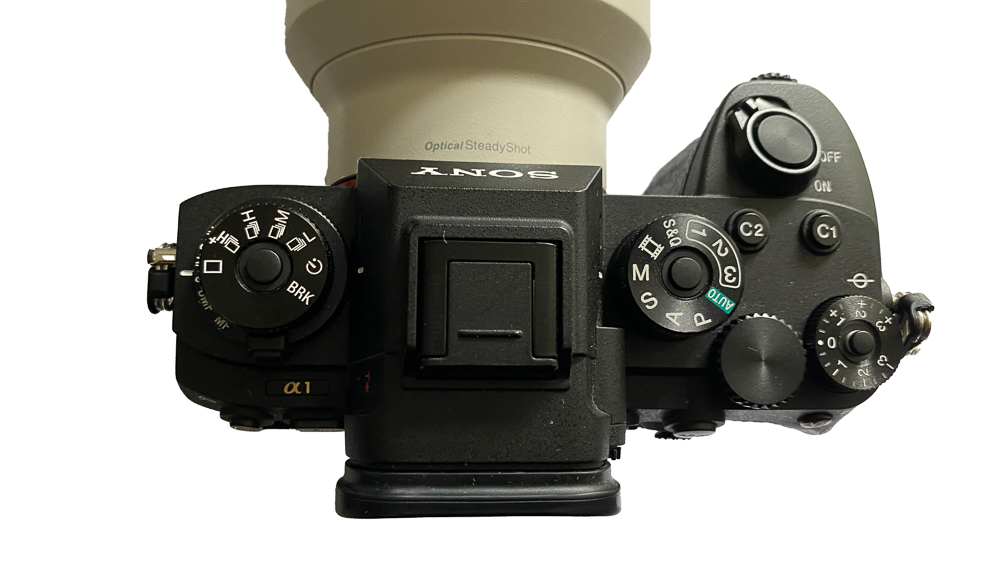
Button Customisation During Shooting
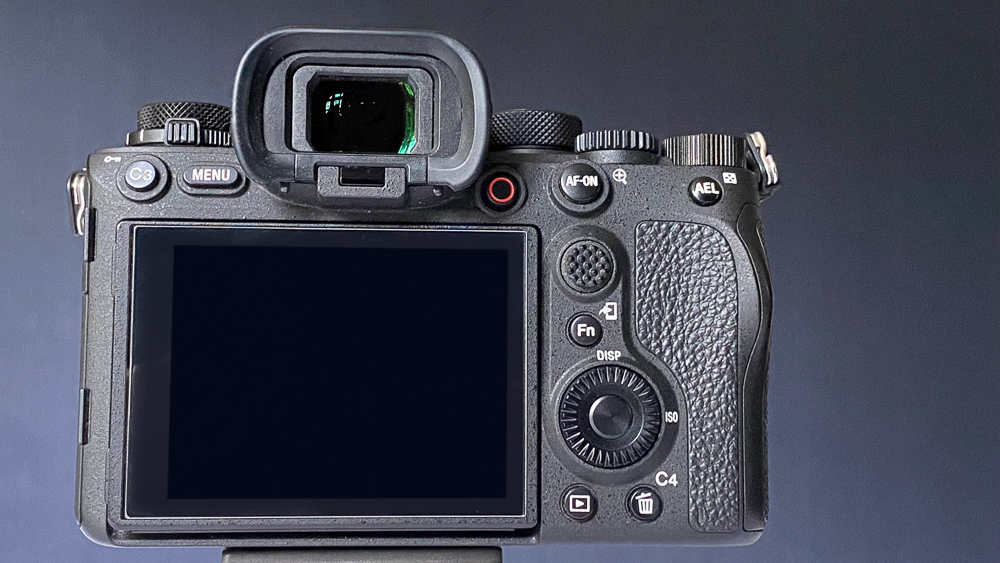
C1 & C2 are on the top of the camera; C3 and AF-On are top left and right, respectively, on the back; C4 bottom right. Function assignment as follows:
- C1: ISO
- C2:White Balance
- (R):Toggle focus area – specific for the mode, i.e., Portrait, Action or Landscape
- C3: My Menu – important for quick access to the auto review function
- C4: Aspect Ratio
- AF-On: toggle between the setting for eye auto-focus, i.e., human, animal, bird (reduced options when using Menu 3: Wildlife)
- ISO (on ring): Minimum speed adjustment for Auto ISO
- AEL: not used (as I found I was pressing this by accident)
Button Customisation During Review
Button customisation:
- Hold Record button to record a voice memo associated with an image – press again to playback
- C1 & C2: mark as one or three stars, for probable deletion or selection
- Send to Smartphone as jpeg. Actually a standard feature; the Fn button with the handy “send to phone” graphic next to it, just does this
- the phone has to be connected and IE (Image Edge) enabled
- the camera must be configured to:
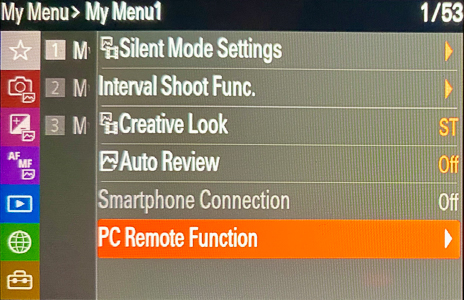
- PC Remote Function: off
- Smartphone Connection: on
both the above are available through My Menu as defined below
Menu Favourites
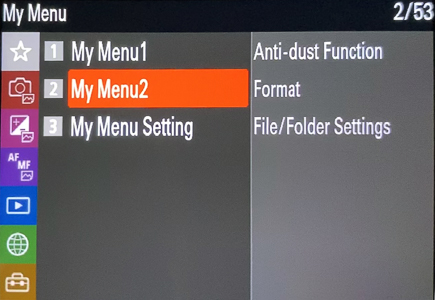
I have configured the C3 button to bring up the My Menu which is the menu items that I access most frequently. Page 1 (My Menu 1) is the commands I’m most likely to use whilst shooting, e.g., Auto Review. Page 2 (My Menu 2) hold commands that I need to access periodically, i.e., a few times a year, such as Format, which I certainly don’t want to press by accident
 |  |
Function List Configuration

From top left:
- Interval Shooting (toggle on/off) – self portraiture, to create a series – combine with menu 1 (portrait) or menu 2 (Action) for moving shots
- focus area (restricted if a memory function is used)
- 16 shot pixel shift, ( for studio or possibly landscape work)
- physical/ electronic shutter selection (usually left on auto)
- metering area – usually remains on “Multi” which makes centre weighted scene assessment
- flash (on/ off) – “on” means fires if flash is connected – which is what I want all/ most of the time
(2nd row) - steady shot (on/ off)
- Creative Look
- Silent Shooting
- Image Quality Settings – RAW, JPEG, etc (would not normal change this, but in case I needed to …)
- Record Media Settings: which card saves the data
- face priority in autofocus (toggle on/off) – can only imagine switching this off if shooting architecture in a crowded environment
Final Note
This is now the third version of this post. I expect to update this yet further as my workflow develops
If you have any comments or suggestions, please comment in the box below